How To Install Genesis Panels
- Genesis panels install quickly and easily fit into almost any ceiling grid system. For use with most 15/16-inch T-bar grid systems. Genesis tiles are not intended for use with 9/16-inch narrow line grid systems. Our lay-in ceiling panels are available in the same sizes as fiber-based ceiling tiles, 2′ x 2′ and 2′ x 4′. If you are using the standard grid size for 2’ x 2’ or 2’ x 4’ tiles, Genesis will easily install into the existing system. There are some grids that use a “stab and connect” system that may cause the corners of the tile to sit higher than the rest of the tile.
- To cut Genesis panels, mark and score the face of the tile with utility knife and snap tile at cut. A circular saw or table saw can also be used in cutting multiple tiles at once and a RotoZip or hole saw for odd sizes shapes and circular holes – like sprinkler heads or can lights. You may also use a metal angle ruler to score and then snap the tile.
- To clean Genesis panels, a mild soap and water solution works well, as do most household cleaners. Just spray the cleaner onto a clean rag and wipe. Power washing Genesis panels is also an option, but avoid placing the spray nozzle tip too close to panel in order to prevent damage to tile face. The tiles are unaffected by most corrosive chemicals, but you should avoid using acidic cleaners. Do not use abrasive cleansers to scrub.
- To prevent the tiles from moving due to significant updrafts, we offer optional hold-down clips that may be used for drafty areas or uneven grid systems.
Please contact us for additional information or for answers to any questions that you may have.
Genesis Stucco Pro Revealed Edge Tile Trim Install
If your ceiling layout requires that you use border tiles to achieve a balanced look to the room, you will need to cut the tiles around the room’s perimeter. Our Genesis Revealed Edge ceiling tiles requires a trim piece be glued onto the cut edge to hold the tile properly in the grid system. Instructions are below.
1. Cut border panels to size.
2. Prepare back of panel to receive trim piece. Clean panel properly by removing any dirt, oil or dust on the cut panel’s edge.
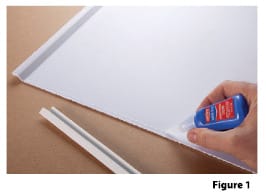
3. Apply LocTite Super Glue in a thin bead about 1/4″ in from the cut edge where the trim will be attached (See figure 1).
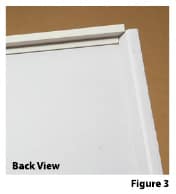
4. Apply revealed edge trim to cut edge of the border panel as shown. Be sure to align properly with panel’s edge. Trim edge piece at an angle if desired. Apply pressure along the entire trim and panel joint to assure proper adhesive bond.


5. Place border tile into grid and repeat until all border tiles are in place. Note: Revealed Edge Trim piece is not intended to support weight other than the tile itself. Insulation, for example, can cause trim piece to detatch.
Note: Revealed Edge Trim piece is not intended to support weight other than the tile itself. Insulation, for example, can cause trim piee to become unattached.
Why Genesis is Easier
Easy cutting
Just use a utility knife to score and snap straight cuts. No electric saw needed. Simply use a hole saw for circular cuts.
Less damage during installation
Unlike mineral fiber tiles, which generally experience 10 percent or more damage during handling and installation, Genesis ceiling panels easily withstand a typical installation with zero product damage.
Flexibility for easier installs
Genesis panels can be bowed to fit into tight, small spaces to accommodate HVAC equipment above the grid without breakage Mineral fiber tiles can break, and vinyl clad tiles have very little give.
Fewer razor blades needed
Genesis PVC does not dull blades as quickly as other ceiling tiles, resulting in fewer blades needed.
Faster cleanup
With Genesis, enjoy half the time to clean up after installation. Dust from gypsum tiles or mineral fiber makes a mess and takes considerable time to clean off equipment, counters and floors.
Recycling
PVC scrap pieces can be taken to a local recycler, saving it from going into the landfill.